Git for WordPress
Developers
The ultimate guide to WordPress Git workflows. 100% free course by WP Pusher.
The ultimate guide to WordPress Git workflows. 100% free course by WP Pusher.
Lesson #1
In this lesson we take a quick look at what Git is. We dive into how Git can be used to keep track of all your code changes. We also take a look at branches and how they can be useful when you are collaborating on a WordPress project. As an example, we will look at the GitHub repository for the WordPress core project.>
Lesson #2
Why is Git relevant to WordPress developers? That question is what we try to answer in this lesson. Many WordPress projects are quite simple, but even for a simple project, Git can really improve and speed up the development process.>
Lesson #3
Every WordPress developer that have code in the official WordPress plugin or theme directories have encountered Subversion (SVN) - Git’s old cousin. In this lesson we dive into the differences between the two version control systems. I hope that after going through this lesson you will realise that Git is probably what you need for your next project.>
Lesson #4
The command line is an intimidating and scary place for a lot of WordPress developers. That is a big shame, since embracing the command line is one of the best things I think you can do for your development career. You will be a lot faster and have some much better tools available if you stick with the command line instead of always relying on a GUI. As an aside, in order to be really effective with Git, you only need about 4-5 commands on a day-to-day basis.>
Lesson #5
In this lesson we look at a few suggestions for installing and setting up Git. We do not go into too many details, as every platform is different. Instead we look at some overall things to be aware of and some recommended settings.>
Lesson #6
There are many different ways to structure a WordPress project in a Git repository. Some people will commit the full installation. Some people like to commit the wp-content directory including all plugins and themes. Personally I recommend keeping each theme and plugin in its own repository.>
Lesson #7
There are a ton of Git commands and thankfully we will never have to worry about most of them. If you just type “git” in a terminal, it will show you the most common Git commands in a list. There are 19 of them and those are the ones we will focus on in this course. No need to worry about all of them, though, since most of the time you will only need a fraction (4-5) of them.>
Lesson #8
The git init command is the first command you will use in any Git project. It is probably one of the commands you will use the least, unless you are starting new projects all the time.>
Lesson #9
Which files were changed or added since your last commit? That is the main question the git status command can help you answer. This is one of the commands you will use all the time and that will quickly become second nature.>
Lesson #10
In this lesson we will learn about the Git staging area. The git add command is responsible for adding your uncommitted changes to the staging area, where they are ready to be inspected before they are finally committed.>
Lesson #11
In this lesson we will learn about the most important and iconic git command: git commit. This is the command that commits your selected changes to your Git repository so you, and your coworkers, can refer to them for eternity.>
Lesson #12
The git diff command is Git’s adaptation of the ancient Unix tool “diff”. This command will compare two different versions of a file. The most common use case would be to compare your uncommitted changes with the latest committed version before your commit it.>
Lesson #13
The git log command will, unsurprisingly, show you a representation of the commit history. What was committed when and by who. It is actually a pretty advanced tool, but in this lesson we will stay close to the surface and not do anything too fancy.>
Lesson #14
The git show command is a companion to the log command. It is one of those commands you probably will not use a ton, but it is good to know about. When you are glancing over the log, git show will allow you to dive into a specific commit. In addition to the log information, you will get a diff from before and after the commit.>
Lesson #15
The git checkout command is one of the most powerful and dangerous git commands. There I warned you! It is most commonly used to jump between branches, but can be used to “check out” old commits as well. It can also be used to wipe out the code you just wrote, so be careful here.>
Lesson #16
The git branch command is used to manage your different branches. That mostly means creating them, jumping between them and delete them. It is not the most exciting command.>
Lesson #17
If this course was an episode of MTV Cribs, this would be the moment where I said “this is where the magic happens”. Git merge can be used to merge two versions of your files. It is mainly used to merge two branches together, say a feature branch into the master branch. If you use GitHub or Bitbucket, they will mostly be in charge of merging your files, which is why I almost never run git merge myself.>
Lesson #18
This is where we rewrite history! Literally. Git rebase can be a bit intimidating, especially on large rebases. However, conceptually it is a pretty simple command. With the rebase command, you can rebase your branch on another branch to include commits that were added after they split.>
Lesson #19
The mv, rm and grep commands are exactly what you would think. They are Git’s adaptation of those old school Unix commands. With git mv you can move files, with rm you can delete them and with grep you can search them.>
Lesson #20
The git clone command is what you use when you want to download a Git repository. It is very similar to the concept of a checkout in SVN. If you are not the one creating the repository, git clone will be your first command to run.>
Lesson #21
The git push command is used to push your local commits to a remote Git repository, for example on GitHub, Bitbucket or GitLab. If your local copy is too much out of sync, just using git push might not work and you will need to do some merging and cleaning up first.>
Lesson #22
The git fetch command is another one of those commands you only need once in a while. It is the command you use to “fetch” a reference to other people’s branches and commits from a remote repository. This is useful if you are doing a code review. It is one of those commands it is ok to look up whenever you need it.>
Lesson #23
The git pull command is what you use to pull down the latest copy of the code from the remote repository. It is actually a shorthand for two separate commands, which is important to be aware of. When you run git pull, you are actually running git fetch (to fetch the latest branch and commit references) and git merge (to merge those branches and commits with your local version).>
Lesson #24
The git reset command is not one to joke around with. It is one of the only git commands where you can actually delete and overwrite stuff that is already committed. It is a way to reset the state of your files to a specific time in history. In this lesson we will dive into how to use git reset without too many accidents.>
Lesson #25
The git tag command is a simple way to save specific points in history by tagging them with a name that is easier to refer to later on. This command is what GitHub uses behind the scenes when you use the release feature on their platform.>
Lesson #26
If you want to know exactly when something happened, the git bisect command is your friend. This command will help you perform a binary search on your file history. It is a very quick an effective way to pinpoint exactly when a specific line of code was added to your project.>
Lesson #27
In this lesson we will dive into the .gitignore file that you can keep in your repository to instruct Git to ignore certain files. This is super useful in order to avoid keeping other people’s code in your repository.>
Lesson #28
The git stash command is Git’s version of “hold my beer”. Sometimes you are working on something that is not quite ready to be committed, but you have to jump to another branch to fix something. With the git stash command you can stash your current work away and pull it back again later.>
Lesson #29
GitHub is probably the most well-known Git host. It is a great place for your code to live, especially if it is open source. In this lesson we will dive into what GitHub is and how it works.>
Lesson #30
In this lesson we will continue our look at GitHub and dive into pull requests (PRs). A PR is a request to merge your own changes into the remote branch on GitHub. PRs are also a great place to do code reviews and have discussions.>
Lesson #31
This introduction builds upon the previous lesson on pull requests. The open source workflow is how most open source projects are organised. After going through this lesson you will be able to contribute to your favourite open source projects on GitHub. It is also a great workflow to adapt for your own development team.>
Lesson #32
In this lesson I will show you some of the lesser known, but awesome, features on GitHub. These tools and tricks can improve your workflow and make it more enjoyable to work on GitHub - a place you will potentially spend a lot of time.>
Lesson #33
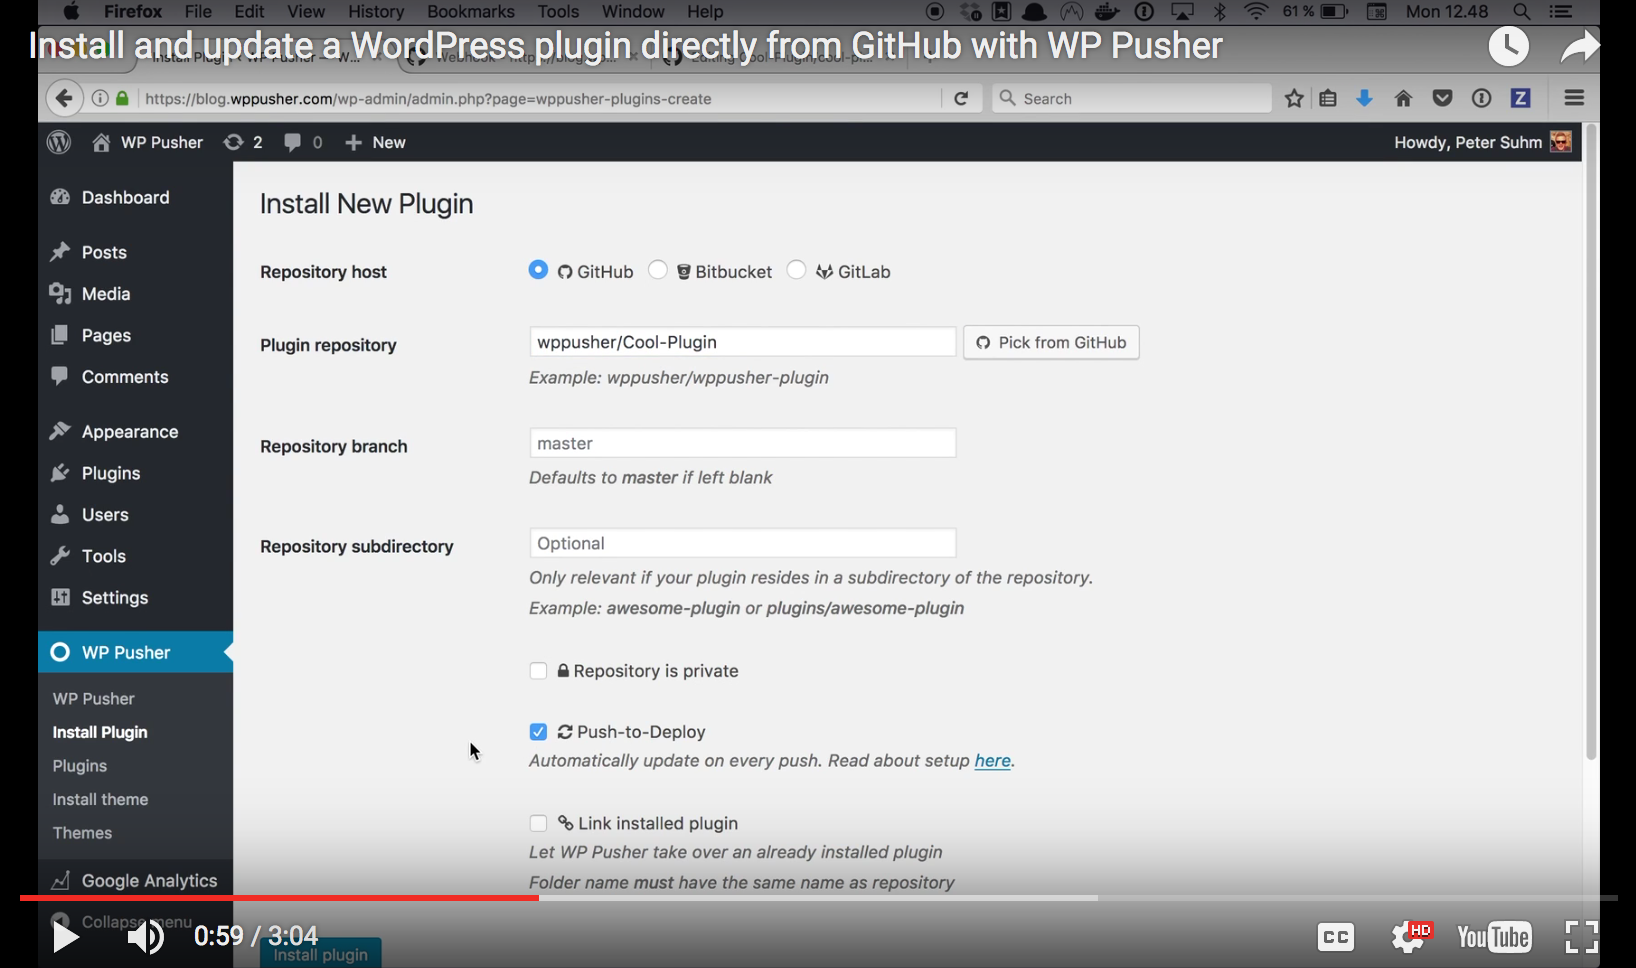
WP Pusher is what enable us to have a Git workflow no matter where our WordPress sites are hosted. Once you have the WP Pusher plugin installed, it can keep your plugins and themes up to date whenever you push changes to GitHub, Bitbucket or GitLab. In this lesson I show you how that works.>
Lesson #34
It is time to get our hands a bit dirty and in this lesson I will show you my preferred workflow when I work with Git, WordPress and WP Pusher.>
Lesson #35
In this lesson we will dive into the nuts and bolts of Git exports and tips and tricks we can use when we ship our code - be it a client project or a theme or plugin on WordPress.org.>
Lesson #36
In this lesson Danny van Kooten from Mailchimp for WordPress shares how he uses Git to ship his popular plugin to thousands of WordPress sites. If you have any projects on WordPress.org I am sure you can learn a lot from Danny.>